Posts

Showing posts from 2016

CodePy Christmas

Image
Merry Christmas: An Introduction to Google Apps Script What is Google Apps Script(GAS)? GAS is a JavaScript-based platform for writing cloud applications and expanding/integrating with Google services. That probably doesn't sound very useful to the average user, but anyone with any JavaScript experience can start using GAS to automate tasks. Today we'll walk you through using a script we've written with GAS and break the commands down into pseudo-code. CodePy Christmas GAS This script does one simple thing: when it is Christmas, it will email you. To use: Go here to open the script Click the 'triggers' button Click 'No triggers set up. Click here to add one now.' Change 'Hour Timer' to 'Day Timer' In the last drop down box select what time of day you want to receive your email Click save and wait for Christmas! Watch the video below:   Awesome, now it's working! But wait, what does all this do? Ho

myDevices Cayenne

Image
About Cayenne Cayenne is an IOT cloud program to assist you in quickly building automated projects with the Raspberry Pi, Arduino, and other boards. You can the easy to use graphical interface to manually control pins, view live sensor data, and set up automated responses to run based on time or events. It also let's you remote control the device in a way similar to a VNC server. Cayenne may no be for everyone though, on some board models the program takes up 100% of the processing power constantly. But not to worry, the program is almost as easy to uninstall as it is to install. This tutorial will walk you through the installation process for Raspbian. Installation Android App Cayenne is best used with the companion Android and iOS apps. After opening the app, it will walk you through logging in (or creating an account) and autonomously locate and install your Pi. After it scans the network, click your Pi and enter the username and password (Default Raspbian Username:

Raspberry Pi Static IP

Image
Raspbian Jessie uses a different network manager than most other Linux systems and previous versions of Raspbian. Most users will have no use for a static IP, but it is necessary in some environments. There is a lot of confusion online, but this method has been tested to work with the newest edition of Raspbian as of August 8th, 2016. Also please note, depending on what you need a static IP for, it may be easier to go into your router(or other DHCP server) and specify an IP for your device there. First, open /etc/dhcpcd.conf with your favorite text editor(We'll use nano). Run the command: sudo nano /etc/dhcpcd.conf Add this to the end: interface eth0 static ip_address=192.168.1.7/24 static routers=192.168.1.1 static domain_name_servers=8.8.8.8 Use Ctrl+X to save and exit Replace ip_address with an IP of your choice, routers with the IP of your router or gateway, and domain_name_server with the IP of a DNS server. If you're on Wi-Fi, change "eth0" to

Install Weaved on Raspberry Pi

Image
Weaved is a free service that allows you to temporarily open local ports to the public internet without the need for re-configuring a firewall. Learn more at their website . Security In any setup, it's a good idea to change the default password. Weaved exposes your Raspberry Pi to the internet, making it necessary to change it. The first step before installing Weaved should be changing your password. On the Raspberry Pi, open a terminal and enter the command: passwd The system will ask you to confirm the old password. The Raspberry Pi's default password is "raspberry". Then enter your new password twice. Remember, as a security enhancement, UNIX-like systems don't show your password as you type. It it also a good idea to add a root password. You can do this by running sudo passwd By default, there is no root password, and this password can be the same as the first one. Getting Started with Weaved In order to use Weaved, you need to make an account. T

Installing Raspbian Jessie

Image
Installing Raspbian Jessie is fairly straight forward. In this post we'll about downloading the image file, installation, and the first boot. Check out the updated version of this post on Steemit! Downloading Raspbian Raspbian can be downloaded from the official Raspberry Pi website . If you don't need all the bells and whistles, or are working with a small SD card, you'll want to download the lite version. However, most users will want the full edition. Please Download with Torrent! For those who haven't used torrents before, it's a method of downloading files, but instead of downloading them from the server, you download from other users who already have the file. Torrents are safe to use and often faster than downloading from the server. By using Torrent, you also save the Raspberry Pi foundation money by not using their server. Remember, they're a non-profit! They need to save as much money as they can! Installation You can follow our instruction

Raspberry Pi: Backup and Restore

Image
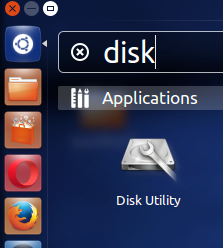
While making another tutorial, I realized one thing I forgot that every Pi owner should do regularly: Backup the SD card in case of a crash  So this tutorial will show how to use our favorite operating system, Linux, to clone an SD card to an image file. Prepare First, you will need to find the path of your SD card. One easy way to accomplish this on Ubuntu systems is to open the "Disks" utility by opening the Unity Dash and searching "Disks". Here is another screenshot of the icon on a Ubuntu system running the Cinnamon desktop: Once the window opens, select your device from the left and the device path should be displayed(See highlight below). If you use a different distribution, you may have to use a different method to find the disk path. Different versions of Ubuntu may also call Disk Utility slightly different names. Now we start to backup the SD card! We're going to be using the dd command, which looks like this: sudo dd bs=XM

Welcome!

Welcome to CodePy DIY Computing! Now this isn't just a blog to promote CodePy products and give nifty little tips(Although we'll do that too) but we want to show you all the other projects we work on. So please enjoy our tutorials and remember to  visit us at our website!